#what program can i use to edit mp4 videos
Explore tagged Tumblr posts
Note
hello!! I really hope this isn't a rude question, bc I'm genuinely curious. I've been wondering for a while now why people who make gifs from a movie or a show or whatever get upset when somebody else uses the gif in something or want credit for it. Is the process difficult? I'm not 100% how to make a gif but I can't imagine it being that arduous. Anyway like I said not trying to be rude have a good day :D
hey there! it's not a rude question if only because you're asking in the first place instead of just discrediting it.
the thing a lot of people don't understand is how much work actually goes into making a gif, because we don't just plug the video into a gifmaking program and call it a day. a lot of us start JUST with the process of pirating the highest quality video we can find, which can be anywhere from an hour or two of downloading to days at a time (my record is five days for all five seasons of the a-team, but that's a story for another day)
so there's already at least a few hours potentially, just from downloading. granted, we do other things obviously but that's still time that's going into the process.
so you have to download those videos, find the clip you want, and then there are several different methods of getting the clip into whatever program you use (i use photoshop). most of the time i have to reformat the video from .mkv to .mp4, because PS doesn't take .mkv but the highest quality videos are typically in that format. so i put that into a reformatting program, which can take at least another hour depending on how long the file is.
so i've finally got the file ready to go in photoshop, and then i can actually start working on the gif itself. i've now spent at MINIMUM two or three hours just getting this video ready. then i personally clip it down to the exact scene i want it and go from there. if you're just doing a random assortment of scenes, you can choose whatever you want. but if you're doing a scene itself, you have to clip that scene in bursts so you can add the subtitles based off the mouth-movement.
so say you're doing a gifset of your favorite character from a tv show. well, you don't want to just have all of the gifs come from the same episode. so you do the reformatting process all over again. more hours. you do that eight or nine or ten times until you have all the scenes you want. and THEN you can start the actual editing process.
what size should it be depending on what kind of gifset you want to do? 540x540? 540x405? do you just crop it first or should you resize it? the resolution might go down depending on how you resize it. do you know what smart sharpen is, and which levels you should have it on in order to make the scene look the best? what's a smart object? what percentage should your frame rate be so it doesn't look too fast? it's completely different between live action and animation, after all. do you know which colors you should use in the adjustment layers, like selective color? does levels or curves work better for what you're trying to do? how do i get rid of the yellow in this scene so it matches the other gifs? what's the difference between linear contrast and medium contrast? should you use exposure or vibrance to get the shadows you want?
you've done all that, it looks good! you go to export it as a proper gif so you can post it to tumblr. but don't forget your settings on that either! transparency dither, web snap, the amount of colors and what size it should be. you do all that and the gif ends up being over the 10mb limit. so now you have to go back and carefully chip away at the frames until it's under the limit, which means you ultimately have to choose what to sacrifice from that scene so you can properly export it.
so you try again. okay, it's on 9.7MB. that's going to read as 10MB on tumblr. back in you go to chip at it again until it's going to read as 9MB instead. finally. you export the gif, add it to tumblr, and then tumblr doesn't like how it looks when you import it and destroys the quality, so you have to go back and try different export settings until it looks the way you want it.
so you do that nine more times. The Entire Process. downloading and reformatting the .mkv, getting the scene you want, clipping it, resizing and cropping it, coloring it, exporting it, and if you're adding subtitles then it's an entirely new process to add on! and don't forget that if you're doing a mix of scenes, you have to color them all depending on their own lighting, so you're basically doing the process again from scratch.
then you try to think of a fun caption. maybe you want to choose a line you feel best summarizes the character or scene. you put that caption through an HTML formatting program so it can be a gradient (the easiest part!), make the caption look pretty, and then tag it and press send.
you've spent HOURS on this process. literal fucking hours. you've been learning how to carefully manipulate the colors to look good, you know what frame rate looks the best, you have all of your settings saved as .psds.
and then someone right clicks, saves the gif (or just copies it) and posts it to twitter with their own funny little caption.
they get 26k likes, who knows how many retweets, a bunch of new follows. they get all the attention for that gif when they put zero work into it. all they did was write a caption and press send.
you got 400 likes and 165 reblogs on your gifset over on tumblr. maybe you get some tags on it if you're really lucky.
so tell me. wouldn't you be a little frustrated, too?
and just in case anyone wants to try and tell me this doesn't happen, you're welcome to compare the stats on this gifset of godzilla versus the repost on twitter.
#so yes it's a very arduous process#and yes we DO have a skillset that no one really acknowledges#part of the reason i stopped making gifs is simply because they kept getting stolen#and i was tired of seeing it#replies!#and i'm not putting this under a read more so yall can read it yourselves
68 notes
·
View notes
Text
aes' video game gif making tutorial 2024 Part 1
Using your own footage. While everything regarding photoshop can be applied to nearly all media, apart from long form videos(5+mins) and videos not in mp4 format; I am still focusing on walking you through making your own footage look as nice as possible.
Needed:
A game and potentially mods for said game
Camera tools for various games (optional)
OBS
Photoshop
My gif making actions so you too can be fast
This tutorial simply opens your recorded footage in photoshop, no other screen cap software is required. Lets fucking go!
[Part 2]
INTRO: From Skyrim to Destiny, recording your own footage of various games is the best method of making your own gifs.
The reason for this is myriad;
+ less artifacting vs YT vids, as seen below

+ you’ll have more control over the content + you can have personal characters + you can alter the settings of the game to be better for gif making purposes
While this tutorial does walk you through most of the steps it is light on exactly/why I use various adjustment layers for coloring, mostly because tumblr began to block my images/links. Other folks have tutorials but I can make one if its something people want.
But the real purpose of this tutorial is to cut the time it take to make gifs down by just opening your file vs. screencaping and so on.
1. Select your game and edit game settings for gif making.
Because we are using OBS, and recording the screen and not the game itself(more on this later), what game you are playing matters little.
Other paid programs like FRAPS still work, as do some free programs like Afterburner/RivaTuner, but when it comes to multiplayer, some may be caught by various anti-cheats and shut down. (ESO will not launch if afterburn is already open, for example). OBS has simply been my go to for around seven years.
Settings.
Please feel free to play around with your game settings to find what works, you may even play a game on different settings from what you record footage under. I do not play with DOF settings on in games but do record with them on.
Dropping your screen-size from and being able to turn on ultra vs medium settings may make your gifs look much better as another example.
+ At least 30FPS, try to avoid stuttering, lower the settings if needed. + Avoid crushing of blacks or blown out whites, especially when giffing POC! Adjust brightness and gamma as needed, HDR isn't your friend here. + While dark nights maybe more realistic and challenging for you, it often produces a dark gif in which nothing can be seen. + Turn off motion blur and film grain, these both add needless file size and look off when scaled down in photoshop. If you want grain add some after. + 720p is about as low for footage as you want to go unless making gifs for very old games. Work with what you have with old games. + Using mods and things like reshade can make your game shine.
Example time; ENB only on top, heavily modded on bottom, no adjustments were made in photoshop.
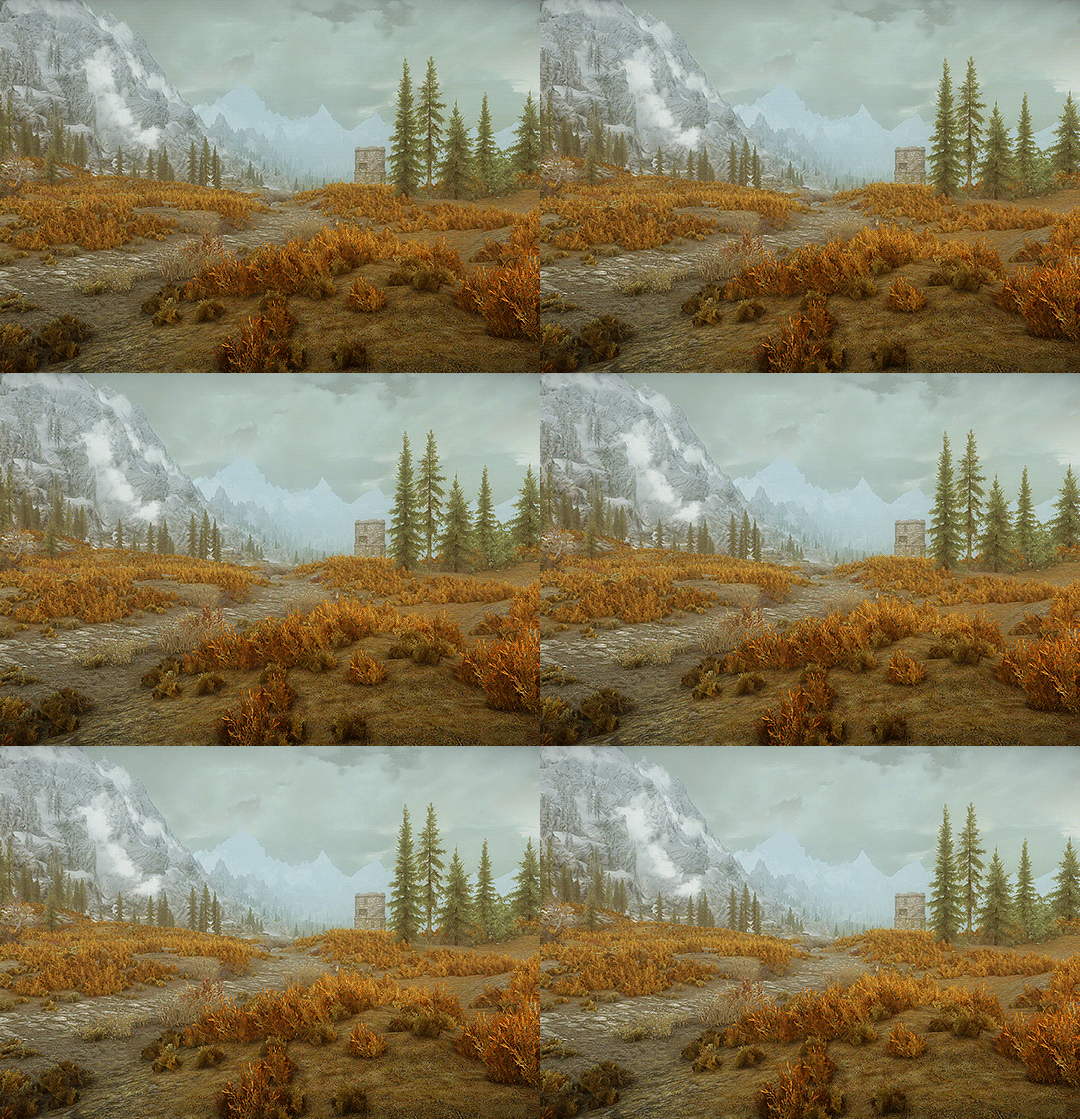
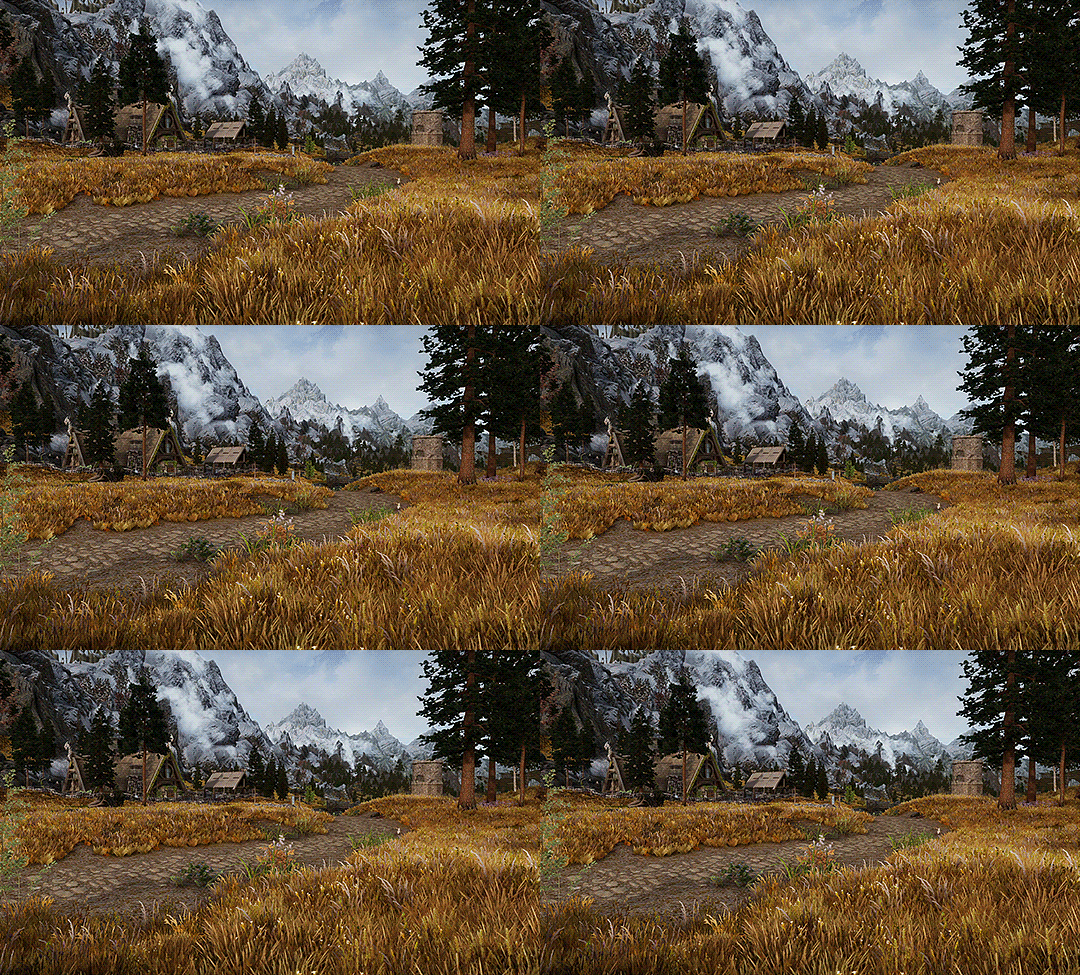
Modding can really alter a game.
Skyrim is very famous for it, but everything from Mass Effect to Pathfinder: Wrath of the Righteous have visual mods! They can make your footage stand out immensely, they can make your FPS drop, or even make it better.
Please be respectful of mod authors. As someone who made them in the past, we are not content farms, we are just folks with a fun hobby like gif making!
I highly suggest any mod that removes screen blur, vignette and film grain!
2. Camera Tools (optional)
So you have your game, now it's time to learn what camera tools exist, if any, for your game. Many games like Rogue Trader and Dragon Age, have free camera mods. Some games like Bethesda games and some Mass Effects, have built in, or partially built in fly cams.
I used to back in the day before DA:O had camera tools back myself into a corner and swing the over-the-shoulder camera around to get gifs, so you have to work with what you have.
If you want to go the paid route there are plenty of camera mods available from assassin’s creed games to BG3. These are generally of better quality and work smoothly, but check around for reviews before you dish out your hard earned money!
Each of these tools will have different commands that you will have to learn.
3. Obtain OBS & set it up
Why OBS?
It's free, it uses very little of your computer's resources. OBS also allows you to switch between screen recording, what I always use, and recording a specific program. Many other recording programs will not record some very old games, some can't record specific games.
Add to that, some hardware recording software will not record shadows or can get light values wrong and you are fighting a battle game after game. So I just go for what's free and works consistently.
I've only known one person for whom OBS failed to work, and that I think was a version issue.
Install OBS, and then make a specific scene all the way on the left;

You can rename this or duplicate it if you also intend to stream(right clicking scene will bring up the menu to do so), I don't use OBS when streaming so I leave this as is.
Right click on the source and ensure it is set as Display Capture. Because some, especially older games, won't work with Game Capture you are going to record the screen. Double click Display Capture if you have multiple screens(I have 2) and select which you want to record!
Next we need to go into settings, over there on the right under Controls. Once in settings, go down to Video and keep the base and output values whatever your actual display size is. I have a 1440 display so it's set to 1440, if you are running 720 make sure it's 720 and so forth.
Ensure 30fps is chosen. Anything more is overkill, for both photoshop and your rig!

Next go to Hotkeys. This will be different if you are using OBS to stream as well, but because I am not, I cleared everything but the recording hotkeys and I assigned them to scroll lock. This is because I've yet to encounter any game or mod that uses the key for anything. Use what makes sense for you, however.

Finally make your way to Output, this is important. Ignore streaming, look at Recording.

+ Pick a folder you want to save in + pick indistinguishable quality, large file size. + Pick MP4+ which encoder you use is up to your system! This is the one that made sense for me and my system. There are tons of videos on YT that go over each encoder. Also here https://obsproject.com/kb/audio-video-formats-guide is the official guide. We need to be able to open the file in photoshop so I tend to lean toward H.264.
3. Test OBS and your game footage together!
Go into your game, record a menu!
If you see something weird here, like your game footage not actually recording, troubleshoot!
With your recording you shouldn't see any stretching.
Now go into game and for 3-5 seconds record you playing, if something isn't recording well, again, troubleshoot. OBS takes a small amount of resources but for older rigs you may need to adjust settings in either game or OBS to get better recordings.
Once you are comfortable, it's time to go wild!
4. Record your gif footage.
+ 5 second clips are best for scenery gifs, + anything from 2-10 seconds can be used for a character talking + anything more than 10 seconds? You'll hit tumblr's limits instantly and will need to make multiple gifs. Which isn't a big deal, but do make note of it as it is much harder for older rigs to open a 5 min 1440p recording than 10 seconds. Depending on the rig it may not even open, so try and make several recordings rather than one long one.
5. Photoshop set up if you pirated an older version
If your gifs look weirdly stretched, check pixel ratio! If your photoshop is legit, or you know that it isn't stretching your gifs wildly you can skip this step.
I don't care how you obtain photoshop, but photoshop has had the ability to open MP4 videos for nearly 15 years. You do not need to, and I do not encourage you to use any screencapping software. That's great for long-form videos, but my computer 12 years ago could open a 5min music video fine and it was a potato.
Often photoshop 'portable' aka pirated photoshop comes with some wild settings, namely, pixel ratio changes. Please check this first;

And look at what default is actually set at, if your gifs always look stretched oddly when uploaded to tumblr.
It should be 1:1.
Then look at,

Again set it to square! Newer photoshop, and non-pirated versions often will let you look at other aspect ratios but won't save weirdly. so 2:1 will still save to 1:1, this hasn’t always been the case with cracked photoshop, especially the version from around 2014.
6. Open

Either drag in all your videos, or just... file → open.
This is why you saved as 5 seconds and MP4, so you didn't need any extra steps!
++Please be aware that older/weaker rigs and laptops can struggle, and if you are seeing crazy hot temps and such its an issue. Seeing Photoshop pause to open/play an action is normal but not chugging. I tell you this so you remember to dust your case and give your hardware some love, fiddle with settings and if this straight up doesn't work with your version of photoshop it might not be for you.
7. Crop your videos
Once you have your video/s open, select the crop tool. (it should be right here in the default setup. or Simply press C on newer Photoshops)

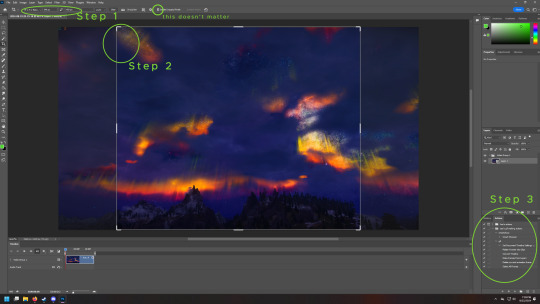
Step 1- in the far left box you want to select Width by Height and then type what size you want to crop to. Height Matters little but Width does matter.
Here are tumblr’s current 2024 sizes again!

10mb is the max, anything more will have a new compression algorithm applied to make it under 10mb.
Please look at the sizes closely. I'll give you an example! Lets say you make your widest gif 1000 pixels, a common wrong size.

I could only fit 20 frames in this bad boy, and its squished, despite the saving compression used, tumblr eats the quality to make it pixelated/artifact-filled.
Compare that to this, 66frames

Slightly different cropping but you get the point.
Same thing with using 540px in the 268px spot.


Compare it to the gifs below which is a 4.83mb 133 frame image in the 268 spot. see how it's less pixelated?

Now back to that Image. Lets talk about... Step 2. Select a range from within the image, try to avoid going to the edges, otherwise you get a 1 pixel wide transparent line. It's hard to see on some blogs, and so obvious on others. Mobile users won't likely see it, but it does take a slight amount more file size as well.
This is what I mean.
Step 3. Time is money, friend. And by this I mean I am going to provide you with the means to skip a TON of steps in the gif making process and just use my action, I'm even going to help you figure out how to fix it when it fails. For the low price of free. If you want the how to, I can break down what all the action is doing, but I haven't even thought about these steps in about 8 years or so.
PART 2 THIS WAY
(because tumblr hates more than 30 images)
44 notes
·
View notes
Text
Poe's Giffing Tutorial (From One Beginner to Another)
Hey, everyone! So, I've been thinking about this for a while, and decided to finally make it happen. This post aims to be a giffing tutorial that isn't a bunch of technical jargon that nobody except experienced giffers understands. This is for the person that I was when I first started out: someone who wants to make gifs, for free, without having to learn the entirety of a new program. As such, if you're already familiar with the basics, this probably won't be super helpful to you.
In this, I'll cover the basics of actually capturing a gif, the how-to of color correction (though without getting into the nitty-gritty detail of it), some basic text effects, and some more decorative effects like overlays and ~fancy coloring. I'll also show you the program I use to resize gifs.
I don't have a fun quip to lead us into the next part, so, uh, let's just dive in.
Tools*:
A PC capable of handling heavy processor loads (I use a mid-range gaming laptop; it's a little slow sometimes, but it works)
Whatever you're giffing (obviously...)
ScreenToGif (a free, basic screencapture program)
Photopea (a free, in-browser Photoshop dupe)
RedKetchup (a free file resizer/converter)
*Note: These are not the end-all, be-all of gifmaking. They may not even be the best tools for the job! But they're free, they work well, and they're relatively intuitive.
Step 1: Capture your gif.
I'm going to use ScreenToGif for this. The first thing I do is open the program and click Recorder, which opens the recording interface.

I click and drag (or manually input dimensions in the boxes next to the recording button in the lower right corner) to set my dimensions, and then I press record. The red "Record" button will change to a blue square that says "Stop," and a timer will appear in the upper right corner, showing how many seconds your gif is.
Generally, I'll pause the video 5-10 seconds before my desired start time, to give myself a buffer (you'll be able to delete those frames later), start the recording, and then start the video. You'll probably find a system that works for you once you do it a few times.
Once the scene that I want to capture is done, I'll click the blue "Stop" button, and the overlay will close itself. A few seconds later, depending on how long/complex/large your gif is, the program will pop up with a new window where you can edit. Here's what it looks like:
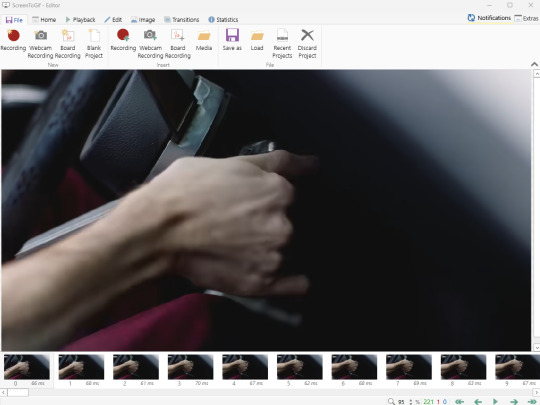
You can do a lot with ScreenToGif, but we'll be using the dead simple stuff today. Click the "Edit" tab, fourth from the left, and this will show up.

"Delete All Previous" and "Delete All Next" are our friends here. Go to the FIRST frame that you want in your gif, using either your arrow keys or just dragging the slider, and select it. Then hit "Delete All Previous." This will make that frame the first frame of your gif. Then, go to the LAST frame of your gif, and hit "Delete All Next." This makes the last frame of the scene that you want the last frame of the gif. You can also use the "Delete" option to delete frames by selecting them with your cursor if you want a more manual option.
Now you have your raw gif! Go to the "File" tab, the first one on the left, and select "Save As" from the menu. You want to make sure that it's saving as a .gif file, not an .mp4 or .apng --- you can check this up at the top. Don't worry, though, as .gif is the default, so unless you change it, you should be golden. Select whatever folder you want to put it in, name it, and save it.
You could absolutely stop here. It is by no means required to color your gifs or slow them down or any other number of things associated with giffing. But if you want to, here's how I do it.
Step 2: Edit your gif.
Head on over to Photopea. You'll see this:
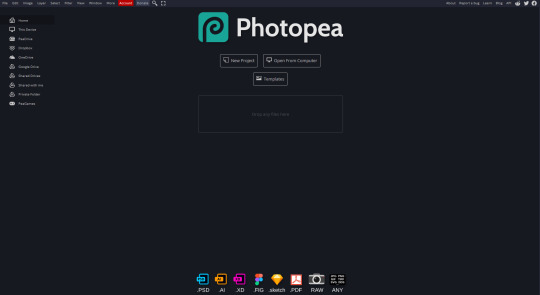
What we want is the "Open From Computer" option. Click it, and your File Explorer will show up. Navigate to whatever folder you saved your gif in and select it by double clicking or clicking once and hitting "Open."
It'll open in a new workspace that looks like this.
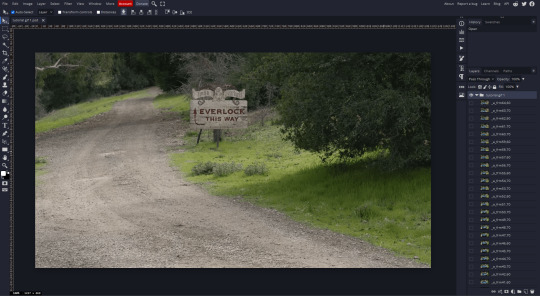
You may be saying, "Gee, Poe, that sure looks a lot like Photoshop!" Yes, it absolutely does. If you're familiar with Photoshop, you will most likely be able to find your way around Photopea just fine, and can probably go from here. But if you're not familiar with Photoshop, here's the basics.
First thing's first: gifs are frequently pretty fuzzy/blurry. Luckily, sharpening them is easy.
Select all your frames (the list on the right with all the numbered layers) by clicking one end, scrolling up/down, holding Shift, and clicking the other end. Then go up to the tabs and do Filter > Sharpen > Smart Sharpen. This will automatically sharpen each frame using a percentage; the default is, I believe, 150%, and this is usually what I use because I am fundamentally lazy.
If you don't select all your frames, only the one that you're currently on (the one highlighted in a lighter color) will get the effect applied to it. This goes for basically anything you do, so it's good to get in the habit of selecting all.
Now that it's sharpened, we can color it. Go up to the tabs again, and go to Layer > New Adjustment Layer > [whatever you want to adjust]. Most commonly in Escape the Night, you'll have to adjust brightness, because there's a lot of dark, moody scenes; Season 3 is also especially yellow/orange tinted, so you'll probably want to color correct it, too, using the Color Balance adjustment layer. This is a total guessing game based on the exact scene you're doing and my method is just selecting random things and adjusting sliders until it looks good (remember: fundamentally lazy). Honestly, I'm not an expert in coloring gifs, so I won't pretend to be — especially since people can and do write entire posts just dedicated to it. For this gif, I'm just lightening it a little.
And if this is all you want to do — no text, no effects — you're done! Go to File > Export As > GIF. It will take a few moments to load, so don't panic when your page freezes. A new window will pop up that allows you to do things like set looping, time, etc. but you can also just "Save" and you're done!
But let's say you want something fun. Maybe you'd like to overlay a quote or make it a cool color. If that's the case, continue on...
Step 3: Make your gif shine.
Three parts in this: text, fun colors, and overlays. You can combine these three to do some awesome things, and they're all very simple to do, once you know what you're doing. Think of them less like steps and more like a mix-and-match deal. You can use one, two, or all three!
So, here we go.
Option 3a: Add some text.
The easiest option of the three, this one works exactly like you think it does. The uppercase T symbol on the sidebar will create a new text layer where you can type something and set a font, size, and color.

I'll spare you the lecture on typography that I could give you — you can find better ones than I could make. Generally, though, you have a decorative/display font for headings and emphasis, and then a different, more generalized font for subheadings and other things. In this, the display font is Heavy Heap, which was used on the Season 3 tarot cards, and the general font is a relatively generic serif font.
(Sidenote: you can load fonts into Photopea! Just go to a font website like Dafont, download the font you want, and then open it as you would any other file by going to File > Open and selecting it from your files. You should get a message that says "Font [Your Font Name Here] Loaded," and then you'll be able to use it in your design. That's how I got Heavy Heap in there.)
You can change size and color with these, which will show up at the top when you select the text tool. Keep in mind that if you're making changes after you type something out, you will need to select (highlight) the text you want to change — it won't do it automatically.

I will admit that Photopea's text editor is not the cleanest, simplest, or nicest to use, especially at first. I came from Canva where it was much faster and easier. The downside, of course, is that Canva is highly limited with what you can do.
There are also ways to warp the text, change the blending, and do outlines, but I'll leave that for another time as to avoid making this any longer than it already is.
Option 3b: Make it a cool color.
You have a couple different ways to do this. Probably the most intuitive is to go to Layer > New Adjustment Layer > Photo Filter. Select the color box, pick the color you want using the picker or a hex code, select your desired density, and click OK. Boom, color over your gif.
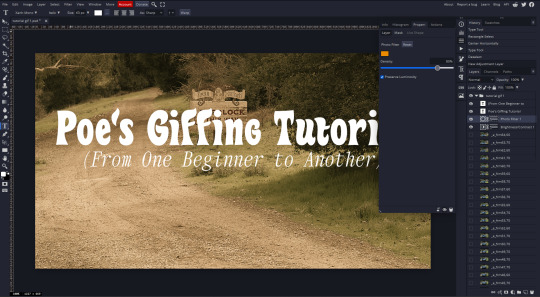
It defaults to this vintage-y orange, but you can pick whatever color your heart desires.
However, I usually use a different method using Gradient Maps. This is also pretty easy; Layer > New Adjustment Layer > Gradient Map. If you leave it black and white, by the way, you get a B&W gif (you can also just select the Black and White option in the Adjustment Layer menu). Click on the gradient, select the white square on the right side of the gradient line, and then select the square down at the bottom of the window and change it to whatever color you want.

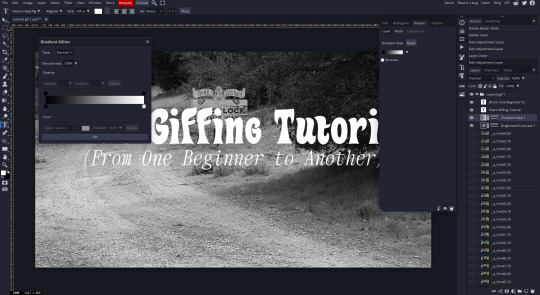
For this gif, I'm leaving it B&W.
(You can have a lot of fun with gradient maps. Play around with them!)
Option 3c: Overlay another gif on top.
Ooookay, so, this is the most advanced and tedious of effects to do (at least of the ones documented in this post), but it's worth it, I promise. For this, you'll need at least one other gif. I usually use a base gif that's relatively neutrally colored, oftentimes B&W but sometimes just faded or pastel, plus one (or more than one) colored, brighter gif. These are, of course, just guidelines — combine whatever gifs you want. The only real requirement, per se, is that they have the same amount of frames. If they don't, it'll look weird. (But if you do end up with two gifs that have different amounts of frames, you can delete the difference right in Photopea, so I don't stress about it too much.)
You also generally want to add text after this step, so if you're planning on doing this, save the text for last.
First things first: color your gifs the way you want and then save both of them. Then re-open them both in Photopea. Yes, this is annoying. I did say it was tedious.

So now I have both of them in my navbar, labeled as "tutorial base" and "tutorial overlay."
Go to your overlay gif and right-click on the gif folder. This is the top layer with a little arrow and folder icon next to the name of the gif.

Select "Duplicate Into" and then pick your base gif in the popup. In my case, it's named "tutorial base."

Now you'll click over to your base gif, and you'll see that your accent has been put on top of your base. Now you get to have fun with blending!
Right click on the overlay gif's folder again. Then, select Blending Options, which is the first menu item. It'll bring up a popup with all sorts of options for styling your layer.

The default setting is Pass Through, which is what we see here. If you want, you could just change the opacity to get your desired effect.
You could also play around with blending options such as Overlay, Color Burn, Lighten, and Screen. Every gif is different, and every gif will look different with different options, so experiment and see what looks best! You may have to go back and recolor it a few times, so I recommend just keeping the project open in your navbar for easy access.
For this gif, I think I'll go with Darker Color at 67%.
One last step, and then you're done with blending!
Go to Layer > Animation > Merge. This will merge each frame of your animation (the gifs) with each other, meaning that they'll play at the same time. If you forget this step, as I do frequently, you'll go to save your gif and find that it plays as a sequence.
Once you've merged your gifs, you can add texts, more effects, PNG overlays, whatever you want! Congrats! You did it!
Step 4: Resize your gif (if necessary).
Maybe you've made a gif, and it's beautiful, and it's amazing, and you wanna show everyone...but it's five million megabytes and you can't send or post it anywhere. Tumblr's max file size is 10 MB, while Discord's (standard) max file size is..7 MB, I think? Either way, if you try to upload something bigger than that, you'll get an error message and the familiar taste of disappointment.
Never fear, Redketchup is here!

This is Redketchup, and it's super simple.
Go to "GIF Resizer" under Animation Tools. Upload your gif, then scroll until you see the Resize GIF section. Input the percentage you'd like to reduce it by (presets are 25%, 50%, and 75% smaller, but you can set it manually, as well).
This is also the step where you can slow it down if you desire if you didn't do it in Photopea — it's in the next section down. Set the speed, if you'd like, and then go down to the bottom and hit Download.

It'll take you to a preview tab where you can check if your gif is small enough. If it is, hit Download again up in the top left, and that's that! Go share your gif with the world!
Conclusion:
Thank you for reading! I am by no means an expert gifmaker, but I want to spread the love and give other people the option to do it. I wouldn't know any of this stuff without the people who taught me, and I'll put a list of tutorials down at the bottom that I referenced when I was first learning to make gifs.
At any rate, if you use this post to make a gif, feel free tag me or send it to me so I can see! And for those of you who are on the fence about learning or starting to gif...
Do it. I double-dog dare you.
:)
References:
Blending Gifs by @the-mother-of-lions
Photopea Coloring Tutorial by @heroeddiemunson
Merging in Photopea by @bellamyblakru
And, though not a specific reference, I frequently browse @usergif for inspiration (they have tutorials there, as well, but I haven't checked them out yet).
#gifset#giffing#gif tutorial#how to gif#how to make a gif#photopea#escape the night#etn#I wrote this instead of socializing at my family's thanksgiving dinner#because that's just who I am
135 notes
·
View notes
Text
Random Non-Fandom Related, but Related to Fandom-Content Question:
How/what programs/apps do you make gifs with?
I feel a bit out of touch with my tech.
I've tried some other programs, but keep falling back to the original one I've always used...A 24 year old thing called Jasc Animation Shop 3 that I first started using when I got online.
Just for context, back then I had to freakin' install a video card in my computer, (no dvd-rom for me yet) slow-motion whatever I was playing on my dvd or vcr, while repeatedly hitting the screen capture button on my WinTv app, THEN save each screen capture, upload the frames into my Animation Shop, resize (which were freakin' small file sizes then, because sloooooooooow internet) and save as gif. (dark times)
Years later, and better computers, I could at least adapt to recording video, editing it in Sony Vegas 6, saving and uploading a mpeg-1 file into Animation Shop.
Currently, at least with better quality video, I can edit a mp4 in Sony Vegas 11, then save as png files, which I can still upload as frames in good ol' Animation Shop 3. I just might have to resize several times until I can get the tumblr-allowed file size (no preview of how large the file size will be until it is rendered) and occasionally the program might crash as I don't think they were expecting us to upload a hundred 2463x1371 images in the year 2000.
So, it works, but maybe not forever. And honestly, I'd like to steamline the process and maybe even upgrade my entire photo-editing (which is still the Jasc Paint Shop 7 that my Animation Shop came with) and video editing (Sony Vegas 11 is already 13 years old and can't handle half my uploads) programs that I have.
But so far, some of the stuff I tried have been AWFUL. Corel (who bought my Jasc company) Video Studio Pro 2023 was confusing, chunky and curned out terrible quality gifs. And the Dell PowerDirectors..ect that came with my computer haven't fared much better.
So, long-tech-rant aside, can someone please tell me what gif or video editing programs are the best?
7 notes
·
View notes
Note
If I wanted to get into making gifs, how does one start? WHERE does one start?
Sorry for the late response! I feel like I might not be the best person to ask, just because I don't make my gifs in the most typical way. There are a bunch of ways to make gifs, and none of them are wrong per se, but most other gifmakers go frame by frame, whereas I like to import the video files directly onto the Photoshop timeline. My way was easier to learn, but can be a little limiting in what I can do with them. I'll include an updated tutorial on how I make mine under the cut below, but if you'd like to go the more typical route, then I recommend checking out one of the popular gif making tutorials, such as this one, as a base tutorial and then playing around with it.
How I Make My Gifs
Needed:
- Adobe Photoshop (I currently use 2023) - Any video editing program (I currently use Adobe Premiere Pro 2020) - A screen recording program (I use OBS)
How to:
1 - Record your game footage using OBS (or any screen recording program). Always make sure your game is running the highest settings. 2 - In Premiere Pro (or any video editing program), import your captured footage and create short, identical length clips that are under 2 seconds each. I recommend exporting in 1080p, no less than 30fps, using the best quality. Export as .avi or .mp4, something Photoshop accepts. 3 - In Photoshop, create a new 1920×1080 file. 4 - Click the Windows tab and make sure you have Timeline ticked. 5 - On the Timeline, click Create Video Timeline. 6 - Click the down arrow to the left of the video layer, and add as many New Video Groups as you have clips. 7 - Click the down arrow on each of those video layers and Add Media (your clips). One video per layer. 8 - Right click on one of the videos in the timeline and change the speed (I usually go 70% but if you like slower gifs, go with 60% or 65%). Then bump the Duration slider all the way up. Do this for all the video clips. 9 - In the layers tab to the bottom right, convert each video clip to a Smart Object. 10 - Resize and crop depending on which size is needed for the set. Here are the dimensions to use for Tumblr. The height can be whatever you want, but the width is very important. 11 - Now for colouring. If you're unfamiliar with editing in Photoshop, it might be helpful to look through the #psd coloring tag and finding something you like. I personally make mine from scratch because game lighting is so unpredictable and varied. It's up to you! 12 - I really recommend some Smart Blur and Smart Sharpen on each of the video layers. How much or little you use will personal preference. At the moment I'm typically doing 0.3-0.5 Smart Blur radius and 0.4-0.5 Smart Sharpen radius. 13 - If you're looking to use subtitles, check this tutorial out. 14 - Click on File > Save for Web, and save each clip this way. Play around with the settings. Just make sure each gif comes out under 10mb, because that's what Tumblr's current limit is. That's it! Hope that was easy enough to follow. If you do make/post some, please feel free to tag me in them. I'd love to see! :)
12 notes
·
View notes
Note
would you ever consider posting a speedpaint? id love to see your art process :]
I WANT TOOOOOOO
but im such a noob in video editing its not even funny 😩... i can record the process of me drawing, but editing it is such a pain. well, its not a pain because i can't do it, but it still hurts.
ive recorded and posted one (1) speedpaint, but the program i did it with broke something in my pc i think, so im not using it anymore. i heard some people say to try windows movie maker, and like, i tried but it doesn't let me import an mp4 file to even start working on it. and i dont know if its normal or not or if im doing something wrong or if my pc is just too old for this? i have an hour and a half of raw footage of me drawing that i can in theory upload, but like why would i do that no one is going to watch that...
and im also too lazy to go down this rabbit hole and google and learn about every single problem im having because its too much... so like. if i ever figure out how or in what program to edit a speedpaint i would love to start making them, but the chances of it happening are very slim...
but also drawing while recording is very difficult, because it feels like someone is watching me and i can't draw normally? like, there's pressure and it makes me draw differently from how i usually do it, its weird...
26 notes
·
View notes
Note
hi recurring-polynya: in a recent post of yours that had to do with orihime inoue's choconomiyaki, you incorporated a gif of orihime's finished creation.
i really would like to know how you create gifs from bleach's episodes.
Here is my process for making gifs:
You will need the thing you want to make your gif out of as a video file (generally mp4) saved locally.
Trim the video down to just the part you want
Convert it to a gif
There are many ways to do these steps, but I've detailed the way *I* do it in excruciating detail under the cut, along with some tips.
Get the video file Ha ha ha, obviously you want to only do this with videos that you have the rights to use and definitely not anything you might find from some link on r/Piracy! I'm going to demonstrate using a free-to-use video I downloaded from Pexels, a great source for free stock footage, specifically this video of some koi swimming.
Trimming the video
Windows comes with two different utilities that work great for this. I'm sure MacOS and Linux have their own versions, I'm just not that familiar with them.
Option 1: Photos Yes, Photos. It actually used to be even better for video editing, but Microsoft has been nerfing it, which is a shame. This will not likely be your default video-viewing program, so right click and then hit "Open With" and then "Photos."
The "Trim" button is the leftmost button on the toolbar along the top of the app (or you can hit ctrl-E).

This will take you into a different screen where you can adjust the sliders to set the start and stop of your video to what you want your gif to be. Then hit that turquoise "Save as copy" button on the upper right. If you hit the down arrow, you can do "Save" instead, but that will overwrite your original file, which you most likely do not want.
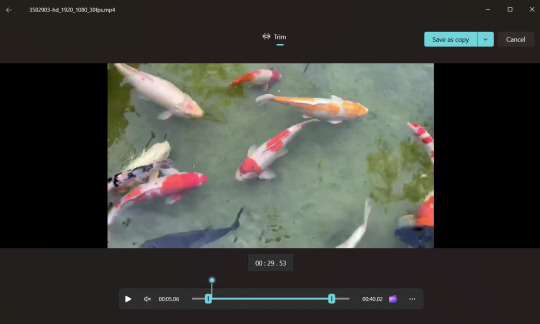
Once you've saved it, Photos will automatically open up your new, cropped file. Now, if your video is long (like an episode of a tv show or movie), it may be hard to get good granularity on your start and stop. You can do a rough trim first, and then repeat the process on your new, shorter file. If you're having trouble getting down to the exact frames you want, don't sweat it, you can take care of that in step 3. Alternatively, you can use ClipChamp instead, which I will describe in just a moment.
Before we go, though, I want to point out that Photos has another really cool feature that you would think most video editing programs would have, but many don't, and that is "Save a frame."
(You need to be back in the regular movie viewer screen, so back out of the Trim window if you're still there)
Pause the video at the frame you want. Hit the "..." button on the bottom toolbar, and the option will be there. (If you're not paused, it will be grayed out).
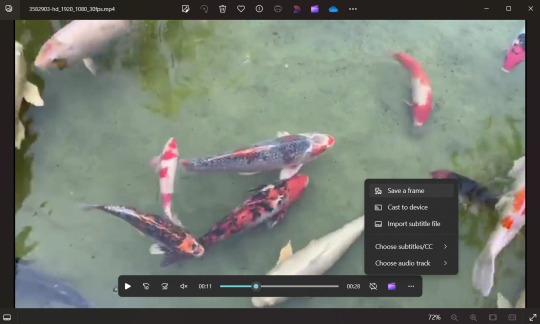
Trimming Option 2: Clipchamp
Clipchamp is a more powerful video editing tool that also comes with Windows. For some dumb reason, you have to be signed into your Microsoft account to use it, and it takes a long time to open especially if your file is big, so if I'm trying to do something real quick, I'll just do it in Photos. On the other hand, if I'm trying to get multiple gifs out of a single video, or I'm trying to do something fancy, it's usually the better tool.
You can right click on your file and choose "Edit with Clipchamp". If you've already got the file open in Photos, you can hit the little purple clapboard icon just the left of the "..." icon in the screenshot above, and that will also open the file in Clipchamp. There's a second icon along the top toolbar, too, because Windows just really really wants you to use Clipchamp.
Here's what our video looks like in Clipchamp:
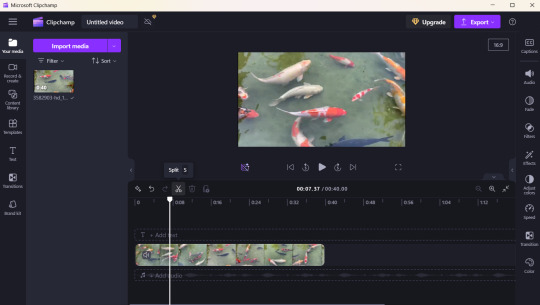
You can drag that white bar around, or use the video controls to play the video or jump forward or back, and then choose the little scissors icon to "cut" it. Then select the part you don't want (in this case, I am setting the start of my gif, so I am going to delete everything to the left), and select the little garbage can icon (or the delete key) to delete it. It will leave a gray space-if you hover over it, a little trash can icon will appear, and you can click it to delete the gap.
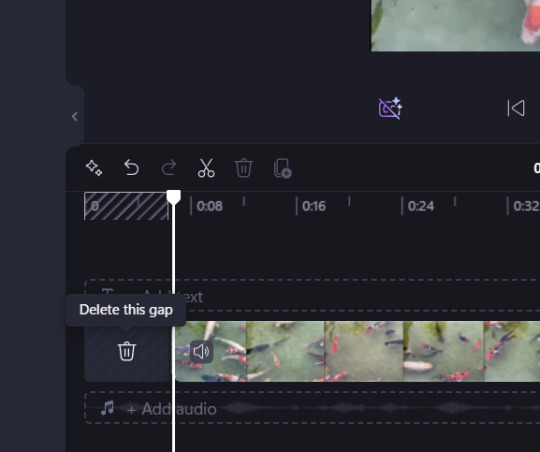
Again, if you're cutting a gif out of a big file, you probably want to do a rough cut first to give you a smaller chunk of video to work with. Then do a finer trim to get it down to just the frames you want. It can be hard to click on tiny, slivery gaps to delete them, so you can also right click in any of the gray area after the end of the video and select "Delete all visual gaps". Also, over on the right, there are little magnifying glass icons you can use to zoom in and out if you need.
Repeat the process to set the end of your video.
Next, go up and hit that purple button at the top right that says "Export." I always pick "Export in 1080p" even if my videos are not 1080p. (Note: If you haven't already deleted your gaps, it will ask you now if you want to delete them, so I guess you can just do it there if you prefer.)
You may notice that "GIF" was an export option. However, the gif it outputs will be small and grainy looking, so I don't recommend using it.
Exporting will take you to this screen where it tries to convince me to post this beautiful koi gif I am making to various social media, including LinkedIn. Clipchamp, thank you, I will not.
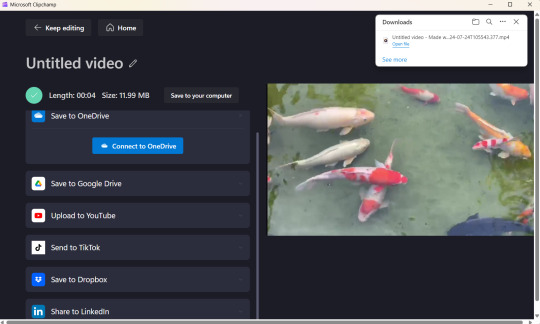
It will automatically save your export to your Downloads folder with an auto-generated filename. You can hit that little "Save to your computer" button (it's above and a little to the right of the bright blue "Connect to OneDrive" box") and save it where you want, with a meaningful name.
Clipchamp has loads of other features--you can use it cut together multiple videos, you can add captions, you can do stuff with the sound. This is not a tutorial on Clipchamp, but I've been able to figure out a lot just messing around with it.
Converting to a gif
For this second part, I use a fantastic website called Ezgif. There's a ton of stuff here, but we are specifically going to use their Video-to-Gif utility.

Hit that "Browse" button and select your file.
Then hit the blue "Upload video!" button. If your file is big, it may take a few minutes to upload. Once it has, it will give you a preview, and some options. I usually leave the options as they are, and hit that blue "Convert to Gif!" button at the bottom.
Note: You could, in theory, skip step 1 and do your trimming right in Ezgif. However, it does have filesize limits. Also, it would take a long time (and bandwidth) to upload a big file--it just makes more sense to me to trim it locally first.

Again, depending on how long your gif is, it may take a few seconds, but then it will give you a preview of your gif (it will be animated, but this is just a screenshot)
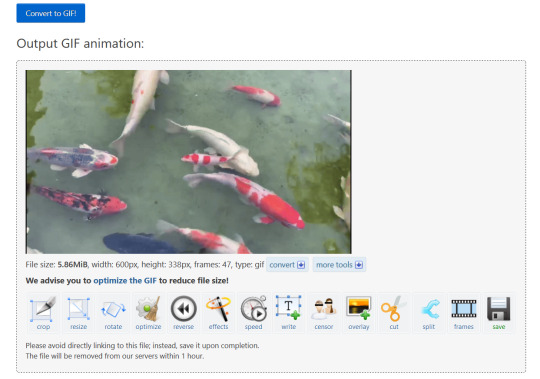
If you're happy with it, you can simply right click and save the gif as is.
Optional, but possibly very helpful:
Right below the preview, it will always recommend you optimize the gif, and I almost always do. Even just picking "Lossy Gif" and setting the compression to 30 will usually reduce the file size by 20-40%. If I have a long or slow gif, I will sometimes also play around with the "remove every Nth frame" option. This is kind of arbitrary, but I aim for less than 3MiB if I'm planning to post it to Tumblr.
It might be hard to see, but I've got some little black letterboxes on the left and right sides of my gif. You can use the "Crop" option to get rid of those.
I often adjust the speed of my gif, especially if removing some frames made it too fast.
If you select the "Frames" option, opens a page that shows every frame of the gif and how long it plays. Back when you were trimming the video, if you ended up with some extra frames, you can turn those off there. Also, sometimes, my gifs end too abruptly, like if the scene cut to something else I don't want in my gif. In this case, you can set the delay on the last frame to be longer, and it may end up looking smoother.
Anyway, Ezgif is easy to explore and figure out on your own and doesn't add any watermarks to your final product. It is one of my very favorite sites on the internet.
Here's my final product:

Hope this was helpful and good luck!
#thank you for this ask! i have the sickness where i simply love to write up a little set of instructions#i am very much an amateur at this but it's fun and the output is good enough for my humble tumblr
4 notes
·
View notes
Text
How to edit captions with your video track
Why: I like making edits of my favorite series, but I hate redo captioning. But I also know quality captions are vital to some viewers (I also use them). To me adding captions is the bare minimum for release, but also hearing all the words and timing them or even re-timing existing captions is very hard with my disabilities and this has been a barrier to me releasing edits. But no more!
DaVinci Resolve lets you add a SubRip (SRT) subtitle track to any video and then edit it at the same time as the video. It also counts as an edit for the Go To Previous/Next Edit button. Con: You can't use the button to jump to big cuts in the video. Pro: You can now easily jump to the an existing timing for someone starting to talk.
DaVinci Resolve:
DaVinci Resolve is a professional video editor with widespread industry use that also has a no-strings-attached perpetual free version. It's got a ton of features in the free version that will more than cover basic editing. It's relatively easy to use (basic tutorials help). If you need more advanced tools you can upgrade to a full license. They don't pester you about it in the free version unless you try to use the advanced tools. I would already recommend using this program to anyone looking to get into video editing.
SRT Subtitles
The SRT subtitle standard is a type of text file that includes subtitles with timings and no formatting. They can be stored separately from a video file or embedded into certain files like MP4s. This is what you'll get if you download captions from YouTube (some YouTube downloaders embed them in the video, some don't). DVD rippers usually have several options. You want an SRT file. And there are websites that host fan-made or fan ripped subtitles for less officially obtained material. You can also make your own SRT file with timings within DaVinci Resolve or with an SRT editor. You can also use this to improve on official captions while making your edit.
A pro feature of DaVinci is it can do machine captioning and then you clean it up. You can also do this for free using YouTube by privately uploading the video, letting it auto-caption, and then editing the captions. You MUST edit machine captions. They are not accurate enough on their own to be accessible. But they can be a step in helping you get it done.
Extracting Embedded SRTs
DaVinci needs an SRT file to import captions. It doesn't seem to extract embedded SRT files from MP4s. Fortunately, it's very easy to extract them.
Subtitle Edit is an open source subtitle editor. It's a great tool if you're making your subtitles from scratch or editing existing ones.
For our purposes, simply open the video with the embedded subtitle track. Click save. Save the SRT file with a useful name somewhere convenient. I recommend using the same name as video it goes with in the same folder.
Adding a Subtitle Track to DaVinci
Rev Tutorial with text and video
Open your project in DaVinci Resolve. Add your SRT file to the bin.
Under "File" select "Import" then "Subtitle."
Or click the Import Media button and add it as normal.
From the bin, select your video and subtitles. Right-click them and select "Create New Timeline Using Selected Clips".
You should now have a timeline where the video and captions are reunited and can be edited together.
Editing the Subtitles
You can now move around the subtitles like any text overlay, including making them longer or shorter. If you click a subtitle you can edit the text and exact timing using numbers. Or edit the timing visually using the timeline. The Go To Previous/Next Edit button can now help you skip to a timing someone else made for you which is usually good enough for a fan cut, making your job easier. From the Edit view you can see the audio track visualizer along with the captions for a perfect cut.
Putting Your Tracks Together
If you're making a compilations, where's where things start to suck. The subtitles are not brought along when you next your clips. They will play over the video, but they won't export to an SRT video or be embedded. You're going to have to manually copy them. But at least now they're the correct length and you have them synced up. I would highly recommend you start your subtitles right at the beginning of the clip or put a fake one in to delete later.
Add your Timelines to a new timeline as usual.
Go to the timeline of the first clip.
With the clip at the beginning, right click the seeker bar and click the select to right button on the circular menu.
Use CTRL + left click to deselect the video/audio tracks. Copy the subtitle track.
Go to the combined timeline. Go to the start of your clip.
Paste the subtitles. You may have to add a subtitle track.
Copy the subtitles from the next clip.
Go to the combined timeline and move to the start of the that clip. Paste the new set in.
Rename your subtitle tracks with the language they're in or type.
Export
Go to the deliver tab. Choose the file name and location. If you're posting to YouTube, render as a single clip, and export to MP4. Under the Subtitle Settings, select "Export Subtitle", Format "As a separate file", and Export As "SRT Without Formatting". Select the subtitle tracks you want to export with the video.
Add to Render Queue. Then render the clips over on the right.
Uploading to YouTube
Upload the video as normal. At the Video Elements step, add subtitles. Select upload file, then with timings. Your subtitles should show up on the timeline and you can check they're correct and fix anything last minute. Do this for each language you add. Continue uploading as normal.
Conclusion
That's my process for adding existing subtitles to my videos. I've wanted something like this for ages so I was super pleased to learn Davinci Resolve has it. I hope this encourages other clip makers with some access to pre-made captions to use them for their videos. It's easy, free, and can even help speed up the editing process. It makes your videos much more accessible and creates a transcript that's searchable and timestamped for easy navigation and quote copying. I really recommend working this into your process so more fans who need captions can share in your work.
4 notes
·
View notes
Text
Gif Making Tutorial: Lightworks Edition
I also uploaded this tutorial on rentry and will link it in the source as well.
This is a guide on my own personal gif-making process using lightworks & Photoshop 2023. This does not mean it is the only way, the right one, or anything of the sorts. This is just the way that I have found that works for me and I was asked to share it.
What you need:
Lightworks -> Download Here
Photoshop
Step #1 When you first boot up Lightworks you'll be greeted with this screen. First, you'll want to hit create a new project which will show the pop-up. You can write whatever you'd like for the title & description as it does not matter here.
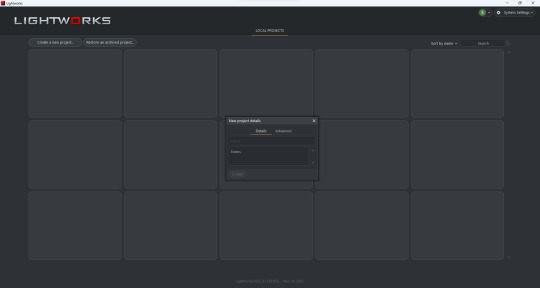
Step #2 Now we are greeted with Lightwork's dashboard we want to import the media we will be using. On the left of the screen towards the bottom you are greeted with a container called libraries with a bunch of different options below it.
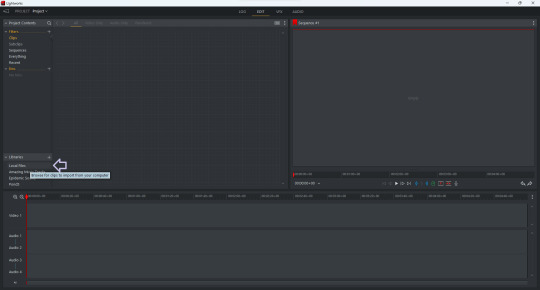
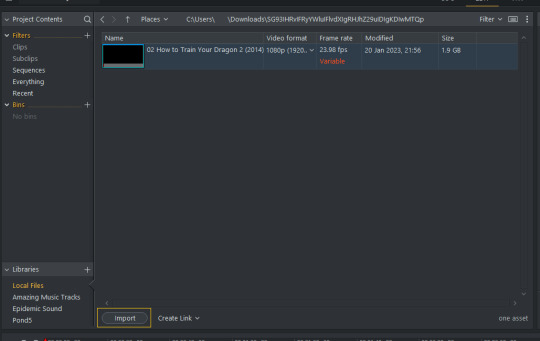
We want to hit Local Files and find our video. You may have to fiddle around and find the correct folder (as I'm unsure where it opens originally). Once you find your video, select it, and then click the "import" option located at the bottom left.
Step #3 Our next step is a bit much so I have also included a video to help. We are going to drag the media onto the timeline as well as remove the audio. Removing the audio is a personal choice, however, I do so because I do want to hear a movie/show in 3-5 second clips :).
Text Guide:
Select media using left click on your mouse and drag it onto the timeline.
Click however many "audio" tracks you have (and make sure you have selected the video one), right-click, and select delete.
Step #4 This is where/when we'll be making the "clips" that will become our gifs. Lightworks has a similar video scrubber as many other programs (however, it happens to have two, but that matters not) which you can use to quickly go through your video. We'll be using two main functions here -- play/pause & clip.
To start/stop the video you can hit the spacebar & to clip the video you hit the C key on your keyboard.
You can let the video play and "clip" as you go, or you can go ahead and clip out parts you know your character isn't in, it truly depends on what you feel flows the best. I will include a screenshot of what a video looks like clipped.
Each spot where you see a "line" through the video is a separate clip, which in turn, is a separate gif. You'll want to do this for your entire video until your timeline has a bunch of little clipped parts.
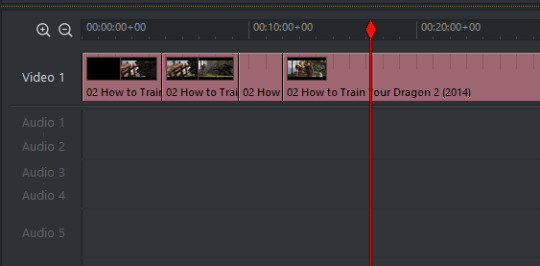
Step #5 Our next step is taking all of our clips and exporting them as their own seperate files. Follow the steps below
Right click the video one track.
Find the option that says make.
Under make select Syncs....
Select V1 segments from the new pop-up.
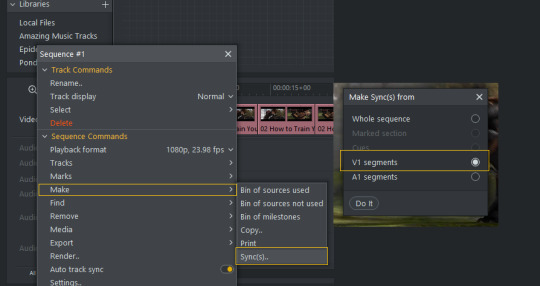
Depending on how many clips you have it might take a few seconds to a few minutes. Once it loads you will see a bunch of new clips!
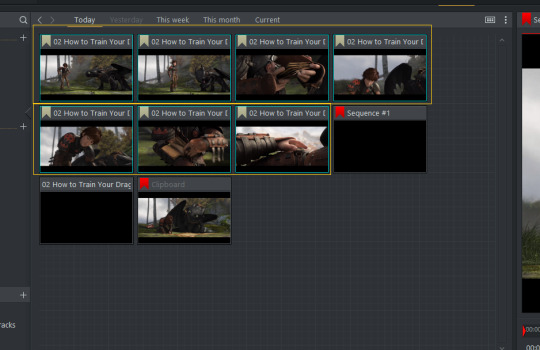
Step #6 Now we want to export all of these clips and Lightworks makes it really easy!
Select all the NEW clips (click one, hold shift, and select).
Right-click any one and select export.
Scroll down until you see H.264/MP4 & pick that option.
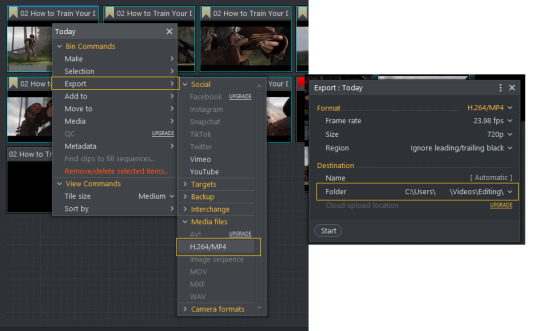
Another pop-up will appear! Make sure that it is exporting to the correct folder and then select start! Two windows will pop-up but do not worry. Window #1 is Lightworks exporting the clips and Window #2 is the tasks log.
If you go to the folder where you set them you save them -- you'll see all the clips ready to be imported into photoshop!
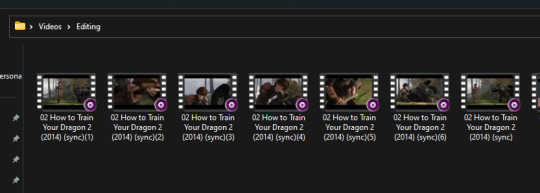
You're now photoshop ready!
And now you are ready to import your clips to photoshop and start gifing away! I hope this helped and if you have any questions -- please do not hesitate to send me an ask, or a DM, and I will do my best to help :)!
21 notes
·
View notes
Note
Can I have some advice on how you make gifs? I want to start making gifs, but I have no idea where to start. What programs to use or how I can even get movies to turn into gifs when there are so many copyright laws trying to stop me.
ah i should clarify that i'm terrible at explaining things, and i'm still a beginner myself but i will do my best to give you some advice/tips that can help you get started!! or at least know where to start looking! i will admit that it does require a lot of patience and some knowledge of photo/video editing. it will seem complicated and overwhelming at first, but take it slow and do your best! (i had to put it under a read more as it got quite long!)
firstly, in terms of what program to use, it's entirely up to you and whichever ones you can get a hold of easily. 'photoshop' is the most popular choice, but i personally use a program called GIMP (GNU image manipulation program), it's free to download and it's basically just a copy of photoshop! the only problem is that a lot of people don't use gimp, so finding tutorials is really hard and photoshop has psds & better quality options. but again, it's entirely your choice! i believe there are a few websites/apps on your phone that can make gifs, but i don't think the quality is always good.
depending on which one you decide to use, just google 'how to make gifs tumblr' and there will be many posts to choose from! i would recommend this one if you're going to use photoshop as it is very detailed & includes other programs you'll need! if you decide to use gimp, unfortunately i can't find the link to the particular tutorial i originally used anymore :( but this tutorial is probably the closest i could find, although there's a few extra steps/plugins that i personally don't use.
secondly, you will need a program/app that lets you take screenshots, i personally use 'kmplayer' but some tutorials will offer you alternatives. i would recommend kmplayer because it also has a built in youtube downloader, and it's pretty safe! this photoshop tutorial shows how to take continuous screenshots for your gifs!
and lastly, getting a hold of footage is the one thing that i really struggle with too. there's different ways to do this but it all depends on your internet security and what you know about t*rrenting/p*rating. you can use a screen recorder to capture scenes though most services won't allow it. perhaps to get you started, i would suggest using download to mp4 websites to get hd clips from youtube, or try your best to find websites that have the movies/shows you want in good quality! i would only recommend using sites like that if you have really good internet security or a vpn. please be extremely careful!!
i hope that you find this helpful in some way!! i'm sorry that i couldn't offer more, but like i said, i am still a beginner myself! i wish you luck if you decide to give it a try! it's a lot of trial and error, but one day you'll figure it out and it'll be a piece of cake :D
#paperbagedhead#answered#i hope its ok to post this publicly!! i thought it could help anyone else who was interested too
12 notes
·
View notes
Text

Kim2091 chaiNNer Templates
Kim2091 made these templates, I am just explaining their use and showing examples. The example chains are pretty simple, but I understand how they can seem overwhelming which is why I have made this. You do require some basic knowledge on chaiNNer and upscaling to make use of these since I will only be going over the relevant nodes.
All credit goes to Kim2091
SIMPLE IMAGE UPSCALE


This should be familiar to you already. This is the basic upscale chain consisting of Load Image/Load Model/Upscale Image/Save Image nodes. These are the only nodes you actually need to run an upscale. View image and View Image External are nodes that let you preview your upscale before/after saving it. You can use the switch on the bottom left of a box to make it inactive during an upscale, allowing you to leave it connected.
SIMPLE FACE UPSCALE

Original (Old picture of H.R. Giger)

Normal upscale

Upscale with added Upscale Face node and GFPGAN (lowered custom scale on upscale face node for size req)

The Upscale Face node is kind of a special node, it will only connect to models that are specifically for face restoration (FaceSR) I don’t believe you will find them in the normal database here is the link for GFPGAN which I am using here in the Load Model node connected to the Upscale Face node (the other model can be any model just the one connected directly has to be FaceSR).
I can't explain exactly how it works, I do know that GANs self-discriminate to produce much more accurate images than normal (in my experience using ESRGAN models which are also used in most of these examples) Here's a Google Doc that can better explain. The difference with a normal GAN model and GFPGAN, or similar FSR models, is that GFPGAN is specifically trained for head/face upscaling. Since it only affects the face, you still need a normal upscale model for the rest of the image. Here are the other two FSR models I know of RestoreFormer / CodeFormer.
If this interests you, search for more broad photography restoration, it’s a very technical/specific photo editing skillset and involves work beyond just this. I recommend starting with Rememorie they do some really awesome work, they also do make use of GFPGAN on occasion so I would look through their resources or reach out to them, they have a Reddit account and a personal website I know of in addition to YouTube.
SIMPLE SPLIT TRANSPARENCY

Original image (regular non-upscaled frame half ereased in PS with outer glow layer style)

Upscaled with normal chain

Upscaled with Split Transparency (ignore the banding, I’m not using a very good example for this)

This chain is used for upscaling images with transparency. It separates the alpha from the rest of the image with the Split Transparency node and upscales each independently before merging them with the Merge Transparency node. You would mostly be using this for textures, but it has a bunch of other uses as well.
Normal upscales only read rgb not rgba (which is why the middle picture is grey on the edge it’s not set up to read the alpha channel), you used to have to separate the image manually in something like GIMP and upscale each separately before going back to remerge, now we have chaiNNer.
SIMPLE VIDEO ITERATOR

Original GIF

Upscaled GIF
Upscaled to MP4 format
(note: custom scale was lowered to fit 10mb upload requirement on GIF, trust me it looked the same either way it does look a bit better if you expand it) Something that you won’t see very commonly used, but it’s there, is Video Iteration which is just upscaling videos (mkv, mov, gif, mp4, avi, webm). You will not get the same results as you will from upscaling frames. I don’t upscale videos using this method so there’s better people out there to explain it and better upscaling programs to do it in. This is just what this chain is and what it’s for.
SIMPLE IMAGE ITERATOR
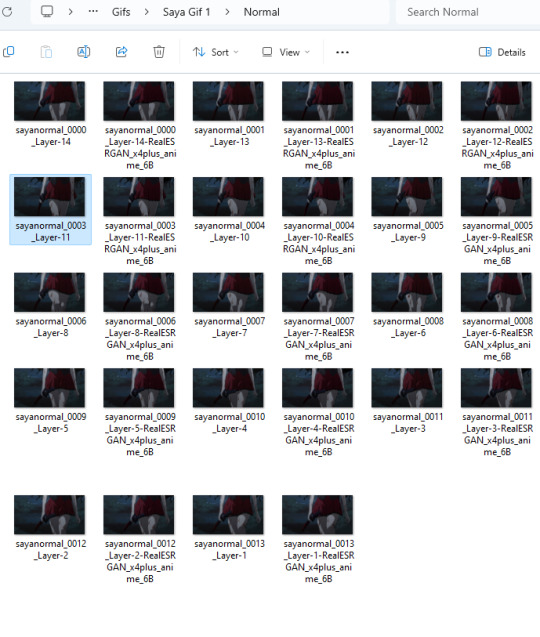

This chain is a batch processing chain. I have some examples here of one's I typically use. The difference between this one and mine is this one is saving to the same folder and using the same image names but adding the model name to the end so there’s no need for a Math node. You do lose a bit of control going with this method.
SIMPLE BLENDED OUTPUT


I have used a x2 model against a x4 model to showcase what this chain does. It’s just two separate upscales overlaid on one another with a Blend Images node and an Opacity node to control the visibility of the overlay layer (upscaled image). If you are familiar with Photoshop, you will be very at home with the Blend Images node since it uses the same/similar blend modes as PS layers.
CAPTIONED COMPARISONS / TWO MODEL COMPARISONS / SIMPLE COMPARISON
CAPTIONED COMPARISON


This is how the chain looks for a basic comparison. This is what people use for their model previews, you’ll see this used a bunch in general. There’s basically three presets that kind of do the same thing so I’ll only be explaining it one time with the Captioned Comparisons preset and showing examples for the other two (Two Model and Simple.)
The node that matters most in this chain is the Stack Images node. This will stack our images either vertically or horizontally into one image. You can hit the button with the plus sign to add more images to your stack.
The Add Caption node will add the name of the model being used for the image as text either on top or at the bottom of the image. By connecting it to the name of the Load Model node, it will use that as the caption so it changes dynamically and you don’t have to type it out. note: the size of the text in the comparison is also determined by the size of the image see a better example below.
TWO MODEL COMPARISON


(since the third caption node is connected to the load image node it’s pulling from the image file name, break the green line and type in a custom caption or keep it in mind while naming your files.)
SIMPLE COMPARISON


No captions, no OG image, just a simple comparison of two models.
OTHER MODELS USED
#upscaling#chaiNNer#videoupscaling#tutorial#ai#chaiNNertutorial#kim2091#assetsbyothers#models#ai upscaling
0 notes
Text
How to Use a Computer, Part 3: Common Filetypes in Windows
In this section, we’ll talk about files and what software tends to open it.
Text and Word Processing
DOC & DOCX: Microsoft Word documents. Word can open DOCX, OpenOffice and LibreOffice can open DOC.
ODT: OpenDocument Text. OpenOffice and LibreOffice use this filetype natively. Word will (begrudgingly) open it, but it will complain about the file being corrupt (the only thing corrupt around here is Microsoft).
RTF: Rich Text Format document. WordPad, Word, OpenOffice, and LibreOffice can open it.
TXT: Text file. Notepad and Wordpad can open it.
Audio
MP3: MPEG Layer-3 file. Every audio player can open it.
WAV: Microsoft PCM sample. Every audio player and audio editor can open it.
AIFF: Apple PCM sample. Every audio player and most audio editors can open it.
MID: Sequenced MIDI file. Windows Media Player can open this, but you might need the MIDI mapper driver on Win 8-11.
FLAC: Free lossless audio compression. Sort of obscure still, but VLC media and most audio editors can open it.
Video
MP4: MPEG Layer-4 file. Every video player can open it.
MKV: Matroska Video Container file. VLC media player can open it.
MPEG: Ye olde thyme videoe filee. MPEG is still supported in Windows Media Player (for some reason).
AVI: Audiovisual Interleave. Every video player can open it.
MOV: Apple iMovie file. Most video players can open it. WMP used to have a problem with MOV, but that got ironed out in Windows 7, I think.
Images
JPG: JPEG file. Every image viewer, editor, web browser, and desktop publishing application can open this.
PNG: Portable Network Graphic file. All the same software that can open JPG can also open PNG.
GIF: You’re on Tumblr. You know what a GIF is. Windows Image Viewer on Windows 7 for some reason can’t open GIFs, relegating them to Internet Explorer.
ICO: Icon file. Most of Windows’ stock icons are packed away in DLLs, but you can edit standalone ICO files and create new ones in GIMP and Photoshop.
File compression and archives
ZIP: WinZip compressed folder. Windows can open these natively.
7Z: 7-Zip file. 7-Zip and, I think WinRAR, can open these. Only 7-Zip can save files in 7Z format.
RAR: WinRAR compressed folder. WinRAR and 7-Zip can open these, only WinRAR can save files in RAR format.
Miscellaneous and Windows system formats
EXE: Binary executable. These are the actual software programs that you run to do stuff with, like GZDoom, Mozilla Firefox, Snes9x, WordPad, and all that.
MSI: Windows installer file. Usually, installers are in EXE format, but a scattering of developers, particularly Microsoft, Mozilla, and Google use MSI. If you need to install something from MSI, just treat it like an EXE and click on it.
DLL: Dynamic link library. Software file directories are lousy with DLLs, but there’s not really any need to mess with them.
CFG: Configuration file. Human-readable configuration settings that can be opened in Notepad and reset manually. Usually, there won’t be any need to do that, though.
There are loads more esoteric filetypes in Windows, but these have been the kinds you’ll encounter the most as a casual computer user. Tune in next time as we discuss Mozilla Firefox.
0 notes
Text
There are a lot of explanation why you would wish to have MP3 recordsdata from YouTube movies downloaded offline. The next instruments will provide help to immensely. It’s rather a lot simpler to have the audio from a YouTube video on a cellular gadget or laptop in an MP3 file to hearken to it, entry and share anyplace. However what precisely is the very best software program to do that? There’s loads. It's best to solely obtain movies from YouTube when you have got permission from the video’s proprietor. Studying YouTube’s phrases of service notes that downloading content material with out permission is strictly prohibited. Disclaimer: Among the merchandise talked about are affiliate hyperlinks, which suggests I could earn compensation at no further price for you. This checklist is put along with my very own analysis, and I'm selling the merchandise that deliver you probably the most worth. You possibly can view my privateness coverage for extra data. HOW TO DOWNLOAD YOUTUBE VIDEOS SAFELY Don’t obtain copywritten content material Use a VPN to guard your knowledge Go to a dependable web site Listed below are 2023’s High 10 Finest YouTube to MP3 converters. 10 Finest YouTube To MP3 Converters in 2023 (Up to date) 1. VideoProc Converter VideoProc Converter helps you obtain & convert YouTube movies to MP3, M4A, MP4, MKV and 420+ output profiles and so forth. with highest doable high quality. It additionally helps batch convert your recordsdata at a 47x actual time sooner velocity. Greater than that, VideoProc Converter can save audio/video/playlist/channel from 1000+ on-line websites, together with YouTube, Fb, Twitch, and extra. It’s your final answer to obtain, convert, compress and edit audio/movies/subtitles at Full GPU acceleration. You received’t have to fret about corrupted recordsdata or random titles in your folders. You want a clear Mac or PC in 2023, get software program that’s quick and trusted! Execs Straightforward to make use of, light-weight and quick velocity. Constructed with level-3 GPU acceleration. VideoProc Converter could make full use of Intel, AMD, and NIVIDA hardware to deliver 47X real-time conversion velocity with out compromising high quality. Built-in with robust media changing, downloading, modifying, and recording options, VideoProc Converter can be your optimum option to obtain, convert, edit, and document any video/audio. It helps 370 enter codecs and greater than 420 output codecs. Convert audio to audio, video to audio with Dolby Digital 5.1 channel encompass sound. Cons: There’s no cellular model for the time being of penning this piece. 2. Free YouTube Obtain The software program could be very straightforward to make use of inside its utility. It's inbuilt a neat method to obtain & convert YouTube movies. It's a nice dependable choice for individuals who do loads of changing of movies to audio. Free YouTube Obtain provides quite a few qualities to fine-tune what your MP3 ought to want. PROS Wonderful, to-the-point design. Permits customers to choose format & high quality. A number of movies may be queued. CONS You possibly can’t obtain movies with a length of greater than three minutes. If that you must, you’ll must buy the total model. You possibly can’t save movies from an internet site aside from YouTube. 3. YTMP3 YTMP3 is as traditional because it will get. This can be very straightforward to make use of and at all times dependable for a free YouTube obtain. I at all times use this for fast on-line downloads. You possibly can rapidly paste a YouTube URL hyperlink after which click on convert and obtain. You then’re all performed. The conversions may be made in straightforward audio and video codecs. The MP3’s come out nice high quality and good file dimension and it’s QUICK. MP4 conversion is a bonus. PROS Easy and straightforward interface
Fast downloads with an optimized file dimension. Dependable CONS No batch downloads Advertisements are annoying and typically don’t permit the obtain to work 4. 4K Obtain MP3 Converter 4K Obtain is a software-based video converter that works with YouTube, Vimeo, Soundcloud, VEVO, and tons extra web sites. This device means that you can convert movies to MP3 by a easy drag & drop. No registration is required, and it’s fast and straightforward to get your MP3 recordsdata delivered. It’s a quick, dependable choice! There are alternatives out there for Mac and Home windows software program. PROS It’s a really skilled and glossy wanting utility. You possibly can obtain from many alternative web sites and tweak the audio high quality as you see match. It has a built-in participant the place you possibly can immediately hearken to the recordsdata you downloaded. The downloads are high-quality, and you'll select from many alternative codecs. The “Sensible Mode” choice applies most well-liked settings to obtain sooner and simpler. CONS You'll have to obtain an exterior utility for the free and paid model, but when you end up downloading many movies and changing to MP3, it’s value it. 5. Wondershare UniConverter This software-based converter makes it into my checklist of the very best YouTube to MP3 converters due to its glossy interface and have studded performance. In 2023, you want an excellent converter to get your recordsdata quick, straightforward and prepared for modifying software program. It’s a dependable choice that can final you a LONG time. You possibly can convert and compress movies in over 1000 codecs, together with MP3, WAV, FLAC and many extra. I at all times use this for modifying tasks as a result of I’m working with quite a lot of codecs and file codecs. PROS Tremendous straightforward to make use of with one-click downloads. The conversion velocity is tremendous quick (30x sooner velocity with out high quality loss), and you'll choose many audio and video codecs for your self. It helps dozens of different video sharing web sites, so it’s acquired you coated for good. You possibly can edit movies throughout the utility. CONS There are some software program limitations with the free model. The paid model permits for full entry. The product is an all-round answer for all types of video/MP3 conversions and isn’t simply restricted to YouTube. Simply well worth the prime spot due to its reliability. 6. Converto Converto is a very free web-based video/audio converter, requiring no particular software program for its execution. The webpage is simple, and all that you must do is to stick the YouTube hyperlink and press enter. From there on, you possibly can choose the format and high quality. The one factor is that the webpage is stuffed with adverts that make the expertise lower than stellar. Achieved! So if you're after a superb on-line YouTube MP3 downloader, this can be a nice choice. Whereas not all movies may be pasted in right here, it's a good place to begin for on-line software program. PROS The converter does what it units out for, good outdated YouTube to MP3 changing Neither do commercials open up, nor do they refill the webpage. Your complete design is easy sufficient and steady Quick on-line software program choice CONS The options are restricted to easy conversion. The obtain hyperlink stays legitimate for twenty-four hours solely. 7. 320YouTube 320YouTube earns a spot on my checklist with all-round options and performance that’s handy. The downloading course of is speedy, and the interface is dependable, although it might be a bit antiquated. It does what it’s imagined to: convert YouTube movies to MP3. Paste your hyperlink or add ‘320’ earlier than the YouTube URL, and your obtain will start very quickly. It’s an excellent choice that downloads at 320 kbps.
PROS Quick Obtain and Conversion It’s easy and converts MP3’s very effectively. The benefit of placing ‘320’ earlier than YouTube is a good characteristic of this on-line device. In case you are downloading rather a lot, that is good to maintain at the back of your thoughts, so that you don’t waste time. CONS The interface will not be very welcoming with loads of textual content. 7. Y2Mate That is one other web-based video/MP3 converter that works solely with YouTube movies. It’s a straightforward and good wanting on-line software program converter and it doesn’t blast you with adverts. The workings are easy; all that you must do is enter the URL or a few key phrases, choose the video and obtain it. Relying on what format you need, choose the orange button for MP3 conversion or the inexperienced to MP4. PROS All widespread audio codecs are supported. All net browsers are supported. No registration is required. You possibly can add the completed product to DropBox or Google Drive, immediately making it accessible to all of your units. CONS The converter doesn’t work with every other video sharing web sites like Vimeo or Dailymotion. The web site doesn’t work accurately on Android, however you possibly can take a look at my checklist of nice Android downloaders. 8. Ontiva YouTube To MP3 Converter Ontiva is a worthy contender for an all-in-one video converter. You've got loads of output choices, and the software program is completely free. This can be a good choice for quick file downloads too! It’s a secure choice because the conversions are nameless, and there's no want to put in any further software program onto the pc. PROS Limitless downloads. Free to make use of. The web site software program is glossy and straightforward to make use of. Helps MP3 and MP4 downloads or every other media format reminiscent of WAV, FLAC, MOV, MKV, AVI. CONS You received’t be capable to obtain from web sites aside from YouTube. 10. MP3 Obtain A worthy contender in my finest YouTube to MP3 converters checklist is MP3 Obtain. This web site has a glossy interface that gives you with easy accessibility to all of its options. You possibly can play with the output format and quantity management to make sure the ultimate file is of your liking, and you can too choose one other format to transform into after changing to MP3, which is ideal to make use of with youtube. For people who find themselves on the lookout for a to-the-point service, this web site is actually a win. PROS Has all options on a single webpage Easy search characteristic Modern and good person expertise The web site allows you to convert YouTube movies to MP3 after which convert it into one other format with a single click on. CONS It solely permits for MP3 conversion, with no video choice. Different Nice Choices for YouTube to MP3 Converters 11. SnapDownloader YouTube to Mp3 SnapDownloader is without doubt one of the hottest instruments to transform audio from YouTube to MP3 due to its superior audio high quality. As a result of it mechanically converts video to audio on YouTube, it has turn out to be one of the efficient softwares for downloading movies because of the minimal effort it requires. One other standout characteristic is that the audio mechanically will get saved if you obtain a video. Most significantly, the software program is suitable with over 900 platforms. SnapDownloader additionally contains a built-in YouTube Search choice, so you need to use the platform on to search for related movies on YouTube. All it's important to do to provoke the obtain is a single click on! Notice that this software program isn’t free and requires substantial funding, however it’s a splurge-worthy product given the superb options which are included! PROS Permits you to obtain audio and video recordsdata as much as 720p and 8K resolutions
Consumer-friendly interface makes the instruments straightforward to make use of Can convert YouTube movies in as many as 7 audio codecs, reminiscent of MP4, MP3, M4A, WAV, AVI, AAC, and AIFF Anticipate well timed buyer help in case of a glitch Permits you to obtain as many as 15 movies at a time CONS 12. aTube Catcher Along with being a YouTube to MP3 converter, the aTube Catcher additionally serves as a display screen recorder. You may finally save some huge cash on laptop assets when you purchase this software program. This device is suitable with each inexperienced persons and consultants and its multi-device compatibility characteristic makes it probably the greatest picks on this checklist. You should use aTube Catcher on GPS units, iPads, iPods, DVDs, VCD, and even cellphones! Use this device when you’re seeking to convert movies to completely different codecs, reminiscent of FLAC, WAV, MP4, GIF, MP2, and MP3. Furthermore, it pushes its boundaries past YouTube to incorporate different platforms as nicely (reminiscent of, Yahoo, Fb, Vimeo, and Metacafe). However, there's a risk that technical glitches can happen when you attempt to obtain or convert movies from these different platforms. The software program can be suitable with completely different languages, which smoothens the method of downloading international movies or audio. Most significantly, aTube Catcher is a free device, so there’s no motive why you shouldn’t attempt it at the very least as soon as! PROS Able to burning movies for DVDs and VCDs Constructed-in display screen recorder for added performance Can obtain movies from completely different platforms like Fb, Vimeo, Yahoo, and Metacafe Drag and drop characteristic within the editor makes it straightforward to make use of Carry out batch conversions of recordsdata whereas downloading playlists in your gadget Shortly converts movies to MP3 recordsdata Recurrently up to date to deal with bugs and new calls for Freed from cost not like most YouTube to MP3 converters CONS Technical glitches might happen when downloading and changing movies from different platforms Why Obtain YouTube Movies and Convert to MP3? There are a lot of explanation why one would wish to transform YouTube movies into MP3’s. You should use the recordsdata with video modifying or audio modifying software program. You possibly can hearken to songs, podcasts or movies offline. You possibly can share, add and obtain the recordsdata from anyplace. MP3 is a universally commonplace format for audio. As at all times, we love the work that creators do, so it's nonetheless finest to first examine with the content material creator to see whether it is okay to obtain. Respect fellow artists! FAQ SaveSave SaveSave Can all these instruments work with my Mac? Most of those instruments are suitable with Macs – in actual fact, I’m writing this text in a single – however if you're concern about compatibility points, I wrote an article on the very best YouTube downloaders for MacBooks you need to use proper now. Can all these instruments work on Home windows? Most of those instruments are suitable with Home windows in addition to Mac’s. Which Free YouTube to MP3 Converter is the very best? Though there are nice choices on this checklist, I perceive typically it takes some effort to seek out the one which adapts to all of your wants. In case you are on the lookout for completely free choices, listed below are our prime 10 free youtube downloaders picks for you. Is it unlawful to obtain music from YouTube to MP3? Technically talking, it isn't unlawful to transform a YouTube video to MP3. Nevertheless, it's unlawful to obtain a copyrighted music video from YouTube.The dialogue continues to be an ongoing problem, and it’s not more likely to be persecuted for doing so. Immediately, with privateness and rights in media being an enormous problem, it’s necessary to grasp you shouldn’t obtain copyrighted supplies.
How To Obtain YouTube Movies To MP3 On the subject of changing YouTube movies to MP3’s, it’s easy. All one actually has to do is copy the hyperlink that they need (so long as they've met YouTubes phrases of service) after which paste it into the converter of their alternative.Should you’re utilizing a web based desktop converter, open up the app after which paste within the hyperlink. From there, you'll almost definitely get a number of choices on the kind of output audio file that you simply like.As soon as performed, go forward and click on obtain!It truly is that easy. Relying in your web velocity and file dimension, this will likely take a few minutes. Are you able to obtain MP3’s offline? You'll need web entry usually. The software program or web site will retrieve the mp3 from on-line.Have a look at the specs of the software program you select as a result of there are superior options that. Being at residence signifies that we have now completely different wifi, knowledge, and wi-fi wants. Should you want recordsdata to be extra accessible, then we hope this checklist helped out! These are the very best YouTube to MP3 Converters that I've present in 2023. You should definitely help the businesses that make this software program for you, whether or not free or paid. Hopefully, this text has helped you discover the very best YouTube to MP3 Converters for you. In that case, please remark down beneath on what you thought, and be happy so as to add the device you utilize. #High #YouTube #MP3 #Converters #VloggerGear
0 notes
Text
hey, so i started vidding just a couple years ago and while it seems daunting, the first vid i ever made ("copycat") was literally just youtube clips downloaded using a youtube downloader (i recommend yt5s.com, but beware the popups) and put together with minimal effects/transitions on hitfilm express, which is a free program. and ironically, it's my most popular video on youtube (excepting the one that got taken down due to copyright claim 😒)! in fact, aside from copycat, "don't know what to do about you," "tolerate it"--which i consider to be one of my best vids--and "therefore i am" were also all from youtube clips and edited on hitfilm--which does take a bit of a learning curve because it's a software that mimics adobe and other 'pro' programs, but it is free! (people in the notes are also recommending DaVinci Resolve, which i haven't tried, but hey there's that too! and also u could try wondershare filmora as prev said. i also use capcut for shorter edits, and though people hate on capcut for some reason, i think it's great, and definitely the best phone editor!)
there's also an unfortunate common narrative among some circles of fandom that you have to be really skilled or do really fancy transitions and coloring and text, etc etc to be a "good" or "popular" vidder, and the fact of the matter is, that's just false. if you line up clips to music in a way that will make the fandom go cuckoo bananas, it doesn't matter how much time you put into making a perfect fade-blur or pink-toned video, that's not what people are going to be talking about. it's the characters, the emotions. ofc it depends on the fandom, because i'm in one that prefers simplicity and another that likes fancy coloring and effects, too. but in my opinion, emotions matter more than all of those supplementary things--which can be fun to include (i love doing my own coloring and transitions!) but are not needed to make you a good vidder.
ALSO! here's a few resources for getting good base footage without having to resort to youtube clips, which sometimes don't have everything you need and aren't good quality:
scenepacks on youtube + instagram! some insta accounts have megafiles of entire shows and movies linked in the post. i downloaded several seasons of supernatural from @/devilzpack--and they have a ton of stuff, seriously it's worth checking it out.
logolessdesires. request to follow them on twitter for updates/password to the site (which rn is 2022desires). this is a MASSIVE archive for vidders & editors in fandom, i highly recommend!!!
on firefox*, use soap2day.to to search for a movie/show, then once you're on the page for the media, press CTRL+I to pull up the page's info. there should be a section labelled "media" at the bottom. left click on the mp4 item and save as, and it should download! this is the safest pirate site i've ever used, and doesn't require a torrent, unlike piratebay. (*chrome doesn't do the same thing when you do ctrl+i, it's weird, just use firefox for this lol.)
Please reblog this post to spread these resources to other vidders and potential vidders! and feel free to add on <3
i really wish amv editing was a more accessible hobby but it has such a high barrier to entry and that really sucks. you can't just pick it up one day, you have to get an editing program and footage and risk giving your computer like eight billion viruses in the process. if you're already involved in amv maker communities it's a lot easier to find footage, but if you're just getting started? and that's not to mention how hard it is to find an editing program if you don't want to spend money because, y'know, you're just getting started and don't even know if you like the hobby yet. and then there's elitism within the vidder community, some meps will only accept people who use a "pro program" which is honestly bullshit. i use fancy expensive editing programs because i am in film school. i am legitimately going into video editing as a career. and i'm sorry, but industry standard or quote unquote "professional" software should really not be the expectation for a hobby.
522 notes
·
View notes
Text
i’m trying to learn the screencapping method for giffing instead of video frames to layers which I’ve done for years, because I’m tired of having to wait hours while my videos convert to mp4 but how do y’all live like this
#it seems like screencapping is what the majority of this site uses#but first of all i can't use kmplayer bc i have mac#so i've had to try 10 different programs to find one that can take batch screencaps#(are some of y'all manually capturing each frame? i'm concerned)#and then i had to do a whole editing of the app to set it up for batch screencapping#and now loading the screencaps into ps is taking forever#and i still haven't gotten to the making it into video timeline step yet#if i could just find an alternative to handbrake that doesn't take literally 8 hours to convert a movie into mp4#this wouldn't be happening#i've never understood screencapping#julia.txt
1 note
·
View note